
Can one pot of rice actually taste this layered and complex?
I was intimidated by biryani for a long time, mostly because it always seemed like a dish reserved for special occasions and expert cooks. Then I finally made it myself, and while it does take some time, none of the steps are actually difficult.
Fragrant basmati rice, tender marinated chicken, and warm spices all layered together and slow-cooked until everything comes together perfectly. 🍚
This is the kind of dish that makes your whole kitchen smell incredible for hours.
What You’ll Need
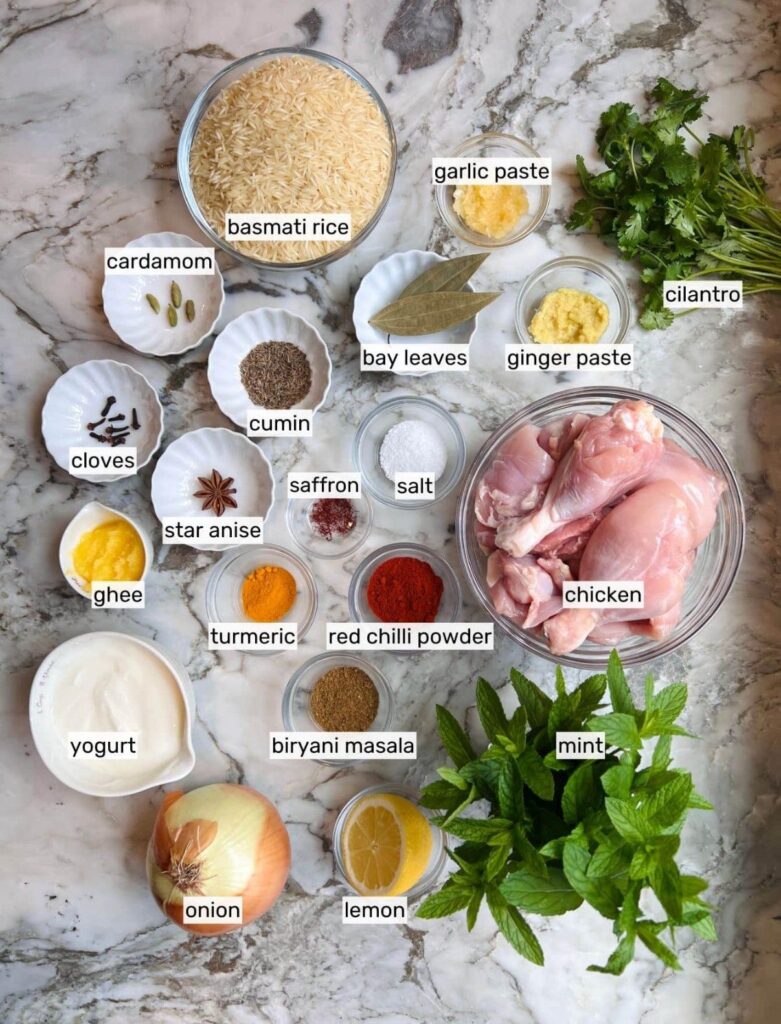
Here’s everything going into this dish:
For the chicken marinade:
- 2 lbs bone-in chicken pieces
- 1 cup plain yogurt
- 1 tbsp ginger garlic paste
- 1 tsp chili powder
- 1 tsp turmeric
- 1 tsp garam masala
- Salt to taste
For the rice:
- 2 cups basmati rice, rinsed and soaked for 30 minutes
- 4 cups water
- 2 bay leaves
- 4 whole cloves
- 2 cardamom pods
- 1 cinnamon stick
- Salt to taste
For the layers:
- 2 large onions, thinly sliced and fried until golden
- 1/4 cup ghee or oil
- 1/4 cup fresh cilantro, chopped
- 1/4 cup fresh mint, chopped
- A pinch of saffron soaked in 2 tbsp warm milk
That’s the full ingredient list. A lot of layers, but nothing overly complicated.
Tools You’ll Need
- A large mixing bowl (for marinating)
- A large pot with a tight-fitting lid
- A separate pot (for the rice)
- A strainer
- A small bowl (for the saffron milk)
How to Make It
Step 1: Marinate the chicken.
In a large bowl, combine the yogurt, ginger garlic paste, chili powder, turmeric, garam masala, and salt. Add the chicken and coat thoroughly.
Cover and refrigerate for at least 1 hour, though overnight gives the best flavor.
Step 2: Parboil the rice.
Bring a pot of water to a boil with the bay leaves, cloves, cardamom, cinnamon stick, and salt. Add the soaked rice and cook until it’s about 70 percent done, roughly 5-6 minutes. Drain and set aside.
Step 3: Cook the marinated chicken.
Heat a bit of ghee in your large pot over medium heat. Add the marinated chicken and cook for about 10-12 minutes, until mostly cooked through.
Step 4: Layer the rice.
Spread half of the parboiled rice evenly over the chicken in the pot.
Step 5: Add toppings.
Sprinkle half of the fried onions, cilantro, and mint over the rice layer.
Step 6: Repeat the layers.
Add the remaining rice on top, followed by the rest of the fried onions, cilantro, and mint.
Step 7: Add the saffron milk.
Drizzle the saffron-infused milk evenly over the top layer of rice.
Step 8: Seal and steam.
Cover the pot tightly with a lid, using foil underneath if needed to create a tight seal. Cook on low heat for 25-30 minutes, allowing the biryani to steam undisturbed.
Step 9: Rest before serving.
Let the pot rest for 10 minutes off heat before opening the lid. This helps everything settle together.
Step 10: Fluff and serve.
Gently fluff the rice with a fork, mixing the layers together slightly, and serve hot.
Pro Tips
- Don’t skip the marinating time. The longer the chicken sits in the yogurt marinade, the more tender and flavorful it becomes.
- Parboil the rice, don’t fully cook it. It finishes cooking during the steaming process, so fully cooked rice at this stage leads to mushy biryani.
- Fry your onions until deeply golden. This is what gives biryani its signature sweet, caramelized flavor throughout.
- Seal the pot tightly. A tight seal traps the steam, which is essential for cooking the rice through evenly in the final step.
- Resist opening the lid early. Letting the steam escape too soon can leave parts of the rice undercooked.
Substitutions and Variations
- Protein swap: Lamb or goat work well for a traditional variation, adjusting cook time as needed for tougher cuts.
- Vegetarian version: Swap the chicken for a mix of vegetables like potatoes, carrots, and peas.
- Spicier version: Add extra green chilies to the marinade or between the layers.
- Egg addition: Boiled eggs are a common addition, sliced and layered in with the rice.
- Shortcut version: Boneless chicken thighs cook faster and still work well if you’re short on time.
Make Ahead Tips
The chicken can be marinated up to 24 hours ahead, which actually improves the flavor.
The fried onions can also be made a few days in advance and stored in an airtight container at room temperature.
Biryani itself is best assembled and cooked fresh, though leftovers reheat reasonably well.
Additional Details
Nutritional Breakdown (Per Serving)
| Nutrient | Amount |
|---|---|
| Calories | ~520 |
| Protein | 30g |
| Carbs | 58g |
| Fat | 18g |
| Fiber | 2g |
Note: Values are estimates based on a 6-serving batch and will vary depending on exact ingredients used.
Meal Pairing Ideas
- Serve with raita, a cooling yogurt side, to balance the warm spices.
- Pair with a simple cucumber and tomato salad.
- Add a side of papadum for extra crunch.
Cooking Time Efficiency Tips
- Marinate the chicken the night before so it’s ready to cook the next day.
- Fry the onions while the rice soaks to save time.
- Prep the saffron milk while the chicken cooks so it’s ready when you need it.
Leftovers and Storage
Store leftovers in an airtight container in the fridge for up to 4 days.
Reheat gently on the stove with a splash of water to help loosen the rice back up, or in the microwave covered to retain moisture.
Biryani also freezes well for up to 2 months. Thaw in the fridge overnight before reheating.
FAQ
Why is my rice mushy instead of fluffy? This usually happens from fully cooking the rice before layering, rather than parboiling it partway. It should still have a bite before going into the final steaming step.
Can I make biryani without a heavy pot? A heavy-bottomed pot with a tight lid works best for even heat distribution, but any pot with a good seal can work in a pinch.
Is biryani very spicy? It has warmth from the spices, but it’s not necessarily hot. You can adjust the chili powder and green chilies to your preferred spice level.
Can I make this dish ahead for a party? Yes. Marinate the chicken and fry the onions ahead, then assemble and cook the biryani the day of your event for the best texture.
What’s the difference between biryani and pulao? Biryani involves layering partially cooked rice with meat and spices before steaming, while pulao is typically cooked together in one pot from the start.
Wrapping Up
This biryani proves that a dish known for feeling intimidating is actually well within reach at home.
Fragrant, layered, and packed with flavor in every bite, it’s worth the extra time it takes to get right.
Make a pot this weekend and let me know how it turned out in the comments below. And if you added your own twist to the spices or layers, I’d love to hear what you made.