
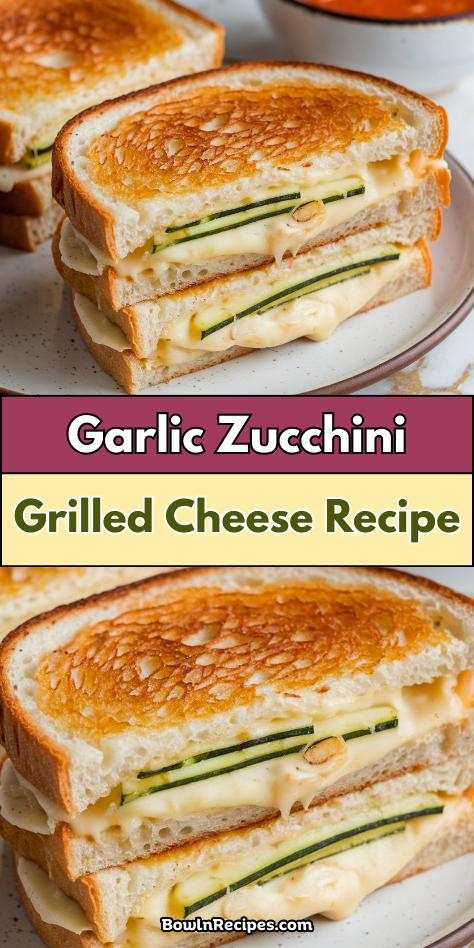
There’s something special about a grilled cheese, isn’t there? Now, toss in some garlic and zucchini, and you’ve got a sandwich worth talking about. Picture the crunch of golden-brown bread, gooey cheese oozing out, and a hint of garlicky goodness.
Sounds dreamy, right? But wait—there’s more to it. This isn’t just any sandwich; it’s a veggie-packed delight that might just surprise you. Curious how it all comes together?
Why You’ll Love this Garlic Zucchini Grilled Cheese
While I mightn’t be the most adventurous eater, there’s something truly magical about a garlic zucchini grilled cheese that I can’t resist.
Seriously, who knew zucchini could be the hero of a sandwich? Imagine biting into crunchy bread with gooey cheese and savory garlic. It’s comfort food heaven.
The zucchini adds a fresh twist, balancing the richness. And let’s be honest, it feels a bit like sneaking veggies into a treat. Who wouldn’t love that?
Plus, it’s a great way to impress friends who think you’re all about plain PB&J. Trust me, you’ll thank yourself later.
What Ingredients are in Garlic Zucchini Grilled Cheese?
Let’s plunge into the delightful world of Garlic Zucchini Grilled Cheese, shall we? Here’s what you’ll need to whip up this deliciously cheesy goodness.
- 2 medium zucchinis, either sliced or grated
- 4 tablespoons of unsalted butter, divided
- 2 cloves of garlic, minced
- 1 teaspoon of Italian seasoning or parsley (your choice!)
- 8 slices of your favorite bread
- 8-12 ounces of melty cheese like fontina, provolone, or Gruyere
- Salt and pepper to taste
How to Make this Garlic Zucchini Grilled Cheese
Step 1: Prep and Sauté the Zucchini
Let’s get started with the zucchini. Take 2 medium zucchinis, and decide if you’re feeling like thin slices or going all-in with the grater.
Whichever you choose, toss them into a pan with 1 tablespoon of unsalted butter. Add 2 minced garlic cloves, a teaspoon of Italian seasoning (or parsley if that’s your jam), plus a sprinkle of salt and pepper. Sauté until the zucchini is soft and fragrant.
Step 2: Cheese, Please
Now for the fun part—combining the zucchini with the cheese. In a bowl, mix your sautéed zucchini with 8 to 12 ounces of your favorite melty cheese.
Fontina, provolone, Gruyere? Go wild! Mix until it’s all cozy and ready for its bread cocoon.
Step 3: Butter Up the Bread
It’s time to talk about bread. Grab 8 slices of your favorite loaf.
With the remaining 3 tablespoons of unsalted butter, give each slice a generous spread. Think of it as a spa treatment for bread, ensuring it gets that perfect golden crust.
Step 4: Assemble the Sandwich
Take one buttered slice and spread a nice layer of your zucchini-cheese mixture on the unbuttered side.
Top it with another slice, buttered side out. Repeat with the remaining slices. Remember, we’re creating a masterpiece here, not just a sandwich.
Step 5: Get Grilling
Heat a skillet over medium heat. Carefully place your sandwiches in the pan.
Grilling these sandwiches takes about the same time as it would to prepare a starter dish in a premium slow cooker while you’re making your main course.
Grill them until they’re sizzling and golden on both sides, and the cheese is melting into gooey perfection. Flip them gently so you don’t end up with a deconstructed version on your hands.
Step 6: Serve and Savor
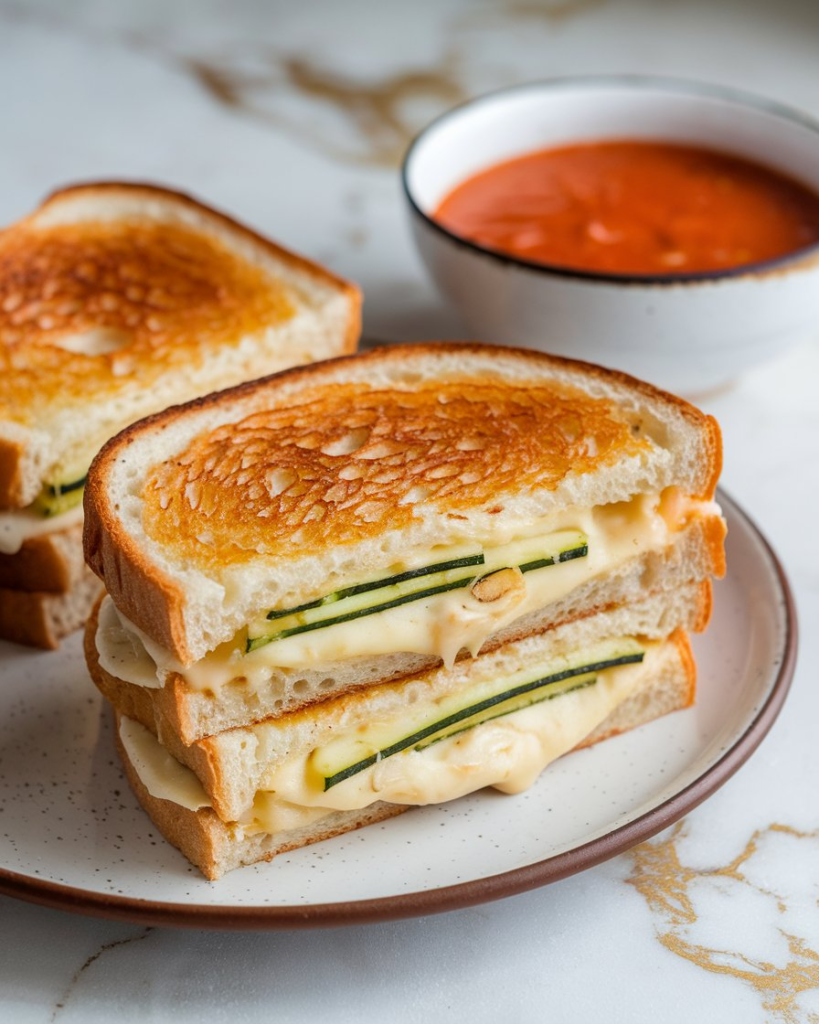
Once they’re grilled to perfection, it’s time to serve. Cut them on the diagonal for that classic grilled cheese look.
Breathe in that cheesy, garlicky aroma. Enjoy them straight away or keep them warm in a low oven while you finish up other batches.
What to Serve with Garlic Zucchini Grilled Cheese
Alright, so you’ve just whipped up a batch of these delightful Garlic Zucchini Grilled Cheese sandwiches.
Now, you’re wondering—what on Earth do I serve with them? Well, let’s explore some tasty accompaniments. If you’re in the mood for something invigorating, a crisp, green salad with a tangy vinaigrette can be a fabulous contrast to the cheesy goodness.
Want to add a dash of sweetness to the mix? How about a bowl of juicy, mixed berries or a sweet apple slaw? For something savory, some roasted tomato soup would be a classic pairing.
And let’s not forget drinks—iced tea or a lemony sparkling water can cleanse the palate perfectly. Whether it’s lunch or dinner, these pairings will have you savoring every bite.
Garlic Zucchini Grilled Cheese Substitutions and Variations
Oh, the possibilities! Let’s plunge into some swaps and tweaks to make this tasty sandwich your own:
- No Zucchini? Try grated carrots or thinly sliced mushrooms. Both bring their own charm.
- Bread Swap: Use gluten-free bread for a coeliac-friendly version. Or go hearty with sourdough for a tangy twist.
- Cheese Options: No melty cheese? Mozzarella or cheddar work wonders. Dairy-free friends, reach for your favorite vegan cheese!
- Butterless Wonder: For a dairy-free option, use olive oil or vegan butter. The garlic will still shine!
- Herb Heaven: No Italian seasoning? Toss in some fresh basil or thyme. Fresh herbs are practically magic, right?
- Flavor Fun: Sneak in some red pepper flakes for a kick, or a dash of lemon zest for brightness.
- Top It Off: Add a sprinkle of parmesan or a drizzle of balsamic glaze before serving. It’s fancy, but not too fancy.
Now, go forth and experiment with your grilled cheese masterpiece. Who knows, you might just invent a new classic!
Leftovers and Storage for this Garlic Zucchini Grilled Cheese
Leftovers of this garlic zucchini grilled cheese? A delightful dilemma indeed. Here’s the scoop on storing and savoring them later:
- Fridge: Pop those sandwiches in an airtight container and into the fridge they go. They’ll be happy for up to 3 days.
- Freezer: Want to freeze? Wrap individually in foil, then tuck them in a freezer bag. They’ll hang out for up to a month.
- Reheating Magic: For crispy goodness, warm in a skillet over medium heat, or try a toaster oven. Microwave if you must, but beware the dreaded sogginess.
- Freshness Factor: Honestly, these are best enjoyed fresh.
But, a quick reheat and they’re nearly as good as day one.
Keep the crunch, keep the love—your grilled cheese deserves it.
Final Thoughts
There’s something wonderfully comforting about this Garlic Butter Zucchini Grilled Cheese. It’s a harmonious blend of savory zucchini and melty cheese, all embraced by crispy, buttery bread.
Ideal for any moment you crave cozy vibes—a lazy weekend lunch, a quick weeknight dinner, or even a laid-back brunch. It’s a dish that’s as flexible as it’s delightful.
And who knew zucchini could transform grilled cheese into such a star? So, go ahead, indulge in this cheesy goodness. Your taste buds will thank you.
Frequently Asked Questions
Can I Use a Different Type of Bread?
Absolutely, you can use a different type of bread. I’ve tried sourdough and whole grain, and both worked perfectly. Just make sure it’s sturdy enough to hold the filling and grill nicely without falling apart.
Is This Recipe Suitable for Vegans?
No, this recipe isn’t vegan as it includes butter and cheese. However, you can easily swap these with vegan butter and cheese alternatives to make it vegan-friendly. It’ll still be delicious and satisfying!
How Can I Add More Protein to the Sandwich?
I’d suggest adding grilled chicken or turkey slices for extra protein. You can also layer in some cooked bacon or use a high-protein bread. For a vegetarian option, consider adding a layer of hummus or mashed chickpeas.
Can I Freeze the Grilled Cheese Sandwiches?
Yes, you can freeze the grilled cheese sandwiches. I suggest wrapping each in foil and placing them in a freezer bag. Reheat them in the oven or toaster oven to keep them crispy when you’re ready to enjoy.
How Long Does It Take to Make This Recipe?
It takes about 30 minutes to make this recipe. I usually spend 10 minutes prepping the ingredients and another 20 grilling the sandwiches until they’re perfectly golden and melty. Enjoy your delicious creation in no time!